
Adding textured designs to walls
January 07, 2009
Share this

This textured stencil project is one I've been thinking about doing for a couple weeks now.
Remember these trim boxes that I added to the walls around our tub?:
 I've enjoyed how clean and simple these were but in the back of my mind, something was always bugging me. I mean...they are frames...meant to frame something...so I had to do it.
Remember these raised stencils that I showed you here?

Well it's time to show you how to do it yourself!
I've enjoyed how clean and simple these were but in the back of my mind, something was always bugging me. I mean...they are frames...meant to frame something...so I had to do it.Remember these raised stencils that I showed you here?
Well it's time to show you how to do it yourself!
You will need four things: spackle, a putty knife, a level and a stencil:

I got this one at the craft store for 40 percent off:

I love these stencils...they have so many options and they are LARGE.
Then I found the center of my "frames" and marked them:
 I taped the stencil up, making sure it was level.
I got this one at the craft store for 40 percent off:
I love these stencils...they have so many options and they are LARGE.
Then I found the center of my "frames" and marked them:
I taped the stencil up, making sure it was level. Then I taped off the spots I didn't want to be included:

If you are using the whole stencil, obviously, you can skip this. Now, here's where I make this take twice as long as it should...
If you are using the whole stencil, obviously, you can skip this. Now, here's where I make this take twice as long as it should...
If you are doing these in white, skip this. But if you want color, like I did (I used extra paint from that room), you just mix the paint and the spackle together:

Just make sure there's not too much paint. You will need VERY little. You want the spackle to keep its spackle consistency.
It will end up like frosting and you will want to eat it:
Get some on your putty knife:
 Don't. :)
 Get some on your putty knife:

Then swipe away on the stencil:

I like a real textured look, so I just kind of slap it everywhere.
What I love about this stuff is you can also make it really smooth and pretty too. It just depends on what you want.
Then pull off the stencil slowly and carefully. If some of your spackle gets under the stencil just wipe it off:

It will come right off. I use a paper towel and my finger nail to wipe off the excess.
If you really mess up, you can wipe off sections or the whole thing! Just do it within a couple minutes or so.

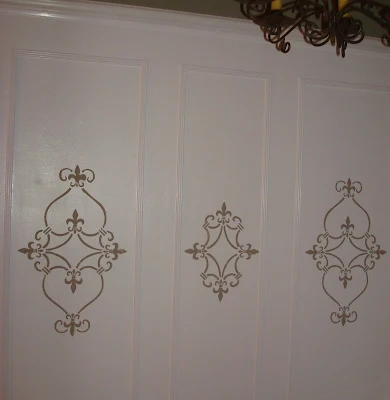
Ummmm... I LOVE IT!! I was going to keep going with them but decided I like just one per frame...any more would be overkill.

Ummmm... I LOVE IT!! I was going to keep going with them but decided I like just one per frame...any more would be overkill.
Total cost for this project was $9 for the stencil! I like using the lightweight spackle, but I bet any would be fine. And you don't need much! The amount in the bowl I showed you did all but one of these panels.
Best part is, you can paint over them. Or make them the same color as your walls...use word stencils...the possibilities are endless!! I LOVE this stuff. (And yes...they can be removed with some light scraping.)
This project took a couple hours for the whole thing...obviously, the smaller the stencil, the easier and quicker it will be.
Also, experiment first, on a piece of paper, cardboard, whatever. See what you like and see how hard you will have to press, etc.
**Edited to add...for the most part, you will want these were small hands cannot pick at them. They will be tempted. :) Although you will be surprised at how strong the spackle is when it dries.
One, don't wait to long to read the books I think the DVD is coming out in March and you will want to watch it.
ReplyDeleteTwo,how 8 year old boy proof do you think this particular project is????
It turned out beautiful!! Now I'm thinking of where I can do this. What a great idea and looks pretty easy.
ReplyDeleteI get all giddy when I get a new friend request on Crackbook too. Reminds me....I need to go check it!! Kristen
Do you ever wonder what you'll do when all of your projects are done? I do, am I'm afraid it will be time to MOVE!
ReplyDeleteWhat a great idea!! Love it!
ReplyDeleteVery cool. I need to try this one. ;0
ReplyDeleteI think my little water closet is screaming for this. Can't wait to try.
ReplyDeleteI've never seen this done before - so cool! Thanks for the tip.
ReplyDeletejust exactly what DOES it feel like to have talent ooooozing from your pores?????
ReplyDeleteThat is so totally cool. Gosh I wish I didn't live in an apartment :( *pout*
ReplyDeleteBTW I think I will befriend you on facebook so be looking for me ;)
And here I was thinking that those molding frames looked just perfect as they were. But, WOW...now they look even more awesome! I have to second Debilyn on her comment. Really Sarah, how DOES it feel to have talent oozing from your pores?
ReplyDeleteI bet it's painful (lol)!!!:)
~Amanda
Um except that I need your name :P But only if you want me :)
ReplyDeleteLooks great!
ReplyDeleteWow, this is awesome! Thanks for explaining it all...it makes it very attainable!
ReplyDeleteWow love that idea. You made it so do-able. I wish I can do this sometime in my lifetime...kudos to you.
ReplyDeleteRub some of that talent off on me...PLEASE??? I love it!
ReplyDeleteThanks for sharing!!!! I have been looking for something to put on an empty wall in our bedroom and bathroom but didn't want to put anything framed. This is perfect!!!!
ReplyDeleteYou did a beautiful job on that! I can relate to having tons of projects lined up, lol!
ReplyDeleteBeautiful, beautiful space!
ReplyDeleteI love this!!! Super cute Idea...I totally want to try it out!
ReplyDeleteThanks!
I loved the end results. I'm going to try this in my home. Thank you so much for posting and explaining how simple it is. Your home is beautiful.
ReplyDeleteWendy
you are fabulous! that looks amazing..I am so jealous I am renting my house right now.
ReplyDeleteYour project turned out great...I have always had a stencil phobia but you make it look so easy!
ReplyDeleteOhhh Sarah, that's SO pretty.
ReplyDeleteSee, now that does make me glad Christmas is over.
What a great project. It looks beautiful!
ReplyDeleteSarah, thanks for including your before & after projects. You've done some wonderful things, girl & I'm gonna tackle doing some moldings below the chairrail in my DR this year too! If you can do it with a small miter box, then I can too. Love your energy & go get-it attitude.
ReplyDeleteHey, I STILL want to see your laundryroom. Can you point me in the right direction so I don't have to search all your archives?? :)
Beautiful!! I am terrible at stenciling so am tres impressed with this.
ReplyDeleteYou are amazing. Who thinks of this stuff??? Beautiful!
ReplyDeleteI tried to find you on facebook by your email but it didn't work.
ReplyDeleteI'm there under Kelly Bozarth Klauser if you want to be my friend! ;)
There you go talking about Hob Lob again!
ReplyDeleteI really love this idea. I may try to use it somewhere in the house we're flipping!
And so my search for what to do with the wall space by my vanity in the bathroom ends...thanks.
ReplyDeleteOMGoodness, I LOVE that! It looks awesome.
ReplyDeleteI love this! I saw someone so this on their cabinets in a magazine a long time ago, and I haven't forgotten it. I have always wanted to do it somewhere in my house, now I know how. Thanks! Your powder room is absolutely GORG! I love all the touches you have added!
ReplyDeleteYou chose such a nice stencil!! Turned out fabulous! laurie
ReplyDeleteI'm trying to figure out where in my house this would look good! I'm loving it! You did such a great job.
ReplyDeleteYou need to just bite the bullet and read the books, they are sooooo worth the messy house and neglected family (your family will forgive you, because lets be honest if you are a mom how often do you get to do things for yourself? My husband was just happy to see me having some me time).
ummmm...
ReplyDeleteSTUNNING!
Awesome idea! I'm still in love with your master bath. I want fancy moldy walls like yours :).
ReplyDeleteThis is an extremely cool idea! I will have to think about how to use it around here! Thanks for the tutorial. I know they can be kind of a pain to post.
ReplyDeleteSarah, thanks for the link, but...it goes to a Projects page, not to your LR. Help me out! Even if it's not green, I still want to see it.
ReplyDeleteHow cute! Hey does this spackling stuff work on face wrinkles? I could use a spackling spatula in my makeup drawers! Buahhhaaaaa! Just kidding. This is such a great idea and I LOVE how you put the stencil behind the towel bar! It looks amazing!
ReplyDeleteDebbie
That is gorgeous! I love the moulding is to die for too!
ReplyDeleteTotally gonna do this on the stairs (see Stewart Little movie). Been looking for a way and this is it!
ReplyDeletewow, that looks like something I could accomplish. I love the way it looks.
ReplyDeleteWhat a cute idea! When my house is built, I'll have to give it a whirl!
ReplyDeleteI love Twilight too, glad you enjoyed it. I like your blog and your ideas. Cool idea on the wall.
ReplyDeleteSarah...this is just beautiful and you make it look so easy and fun! Your project looks amazing, I'd love to see it in person as I know everything gives more impact up close and personal!
ReplyDeleteA question...I GET why everyone is atwitter about Twilight but FACEBOOK? My kids have facedbooked themselves to death since early 2004! They are over and done with it. Why is this ancient medium(according to the KIDS) suddenly so popular in the bloggy world? Clue me in! Thanks!
xoxo, Lamp Tramp
Ok you are too cool for school! Love the stencil idea! Hope you had a great holiday season! Hope to be visiting more now that school will be done for me in 5 days!
ReplyDeleteYou've had some great projects in 2008, and I love how you post tutorials. :-)
ReplyDeleteVery coooooooool. Twilight is crack...don't know about facebook...never been and now I wont...you have me sceeeeeeeeeeered.
ReplyDeleteI found your blog through Domestic Fashionista. I love what you did with the bathroom! I need to do something with mine. It's so boring!
ReplyDeleteI love your projects and I love your writing style. So much fun to see AND read!
ReplyDeleteI am totally in love with this idea. You have got my head spinning with the possibilities now. :) Thank you so much for sharing.
ReplyDeleteGreat project! Thanks for sharing!
ReplyDeleteJust wanted to let you know I talked about you on my blog today. Love your blog!
ReplyDeleteThis is so cool!!! Now, what time will you be here to do this for me??? xo
ReplyDeleteGreat job on the additional texture to your bathroom molding. Super look.
ReplyDeleteBlessings,
Sher
What a great idea...and it looks so classy too. I love it.
ReplyDeleteNow if I could just get my kitchen done so I can tackle some of this other stuff and use some of your ideas1
Looks awesome. I especially love the one around the towel rack!
ReplyDeleteOk - I just found your blog and I LOVE IT already! anybody who is addicted to both Facebook AND Twilight is my kind of girl!
ReplyDeleteThis is SO COOL! Love it! I too have fallen in love with facebook (just got my hundredth friend and felt like I could throw a party, of course I couldn't say that out loud or people might think I was pathetic, uh well I guess I am!) LOL Twilight is another obsession I had last fall. I started the books on a three day weekend and finished the first three! LOVE THEM. (The host is good too.
ReplyDeleteLooks fabulous!
ReplyDeleteGreat idea. Did you try with a paintbrush or other "utensil" thing to freehand a design instead of stenciling (say you couldn't find a stencil you liked)? And how much paint to spackle, approximately? You will get a shade lighter than your wall if you use leftover paint, right? Sorry so many questions. I'm excited to do this, but I only have so much paint leftover from the previous owners!
ReplyDeleteNice!
ReplyDeleteIn your bathroom,you have them above the sink...which is where I desperately need SOMETHING. Do you have problems with the spackle getting wet and....melting? That's what I'm worried about in that area.
Hi Sarah,
ReplyDeleteThat is gorgeous! You are so talented...when ya coming over to my house? ha! I have wainscoting in my dining room that I keep looking at thinking it needs something...
Hey, email me (my email or at facebook) your address, I have something I want to send you...I know you have too much stuff, haha, but I am sure you will like what I want to send you :)
Bella
Thrifty girl - hey thanks so much for visiting my blog and commenting! I wanted to do the same. I was gonna let you in on one of my stenciling tricks.... we use QTips to help remove the "bleeds".... keep them handy. If you wet a QTip.... it will help take the excess right off.
ReplyDeleteLOVE your blog... I'm be followin' you! Blessings, Jennifer Allwood
What a wonderful touch;) Looks great and easy enough to do! Came by from METMon at Susan's;) French
ReplyDeleteWhat a neat idea to dress up plain walls...thanks for sharing the steps! And thanks for participating in Met Monday! :-)Susan
ReplyDeletebetweennapsontheporch.blogspot.com
Very cool!
ReplyDeleteRe. Twilight & facebook - I started on the books right before New Years and then joined facebook this week so I could join Twilight groups.(silly fun) You'll love the books!
Check out my blog for my rundown.
Missy
oh my goodness!!! i am so so very excited about this project! I can't wait to try this in my home~have I told you lately that your blog is awesome~thanks for sharing
ReplyDeleteThis looks so nice!
ReplyDeleteIf you addressed this, I'm sorry, didn't see it in the comments, but HOW do you remove it when the time comes? I'm slightly hesitant to do something with the dimension..maybe just a flat stencil bc of eventual removal issues. But this is so much nicer.
thanks
Chrissy